Pages

Sunday, 29 April 2012

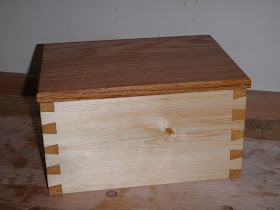
Dovetailed Box

After attempting my first dovetails around November last year, I haven't built upon the experience or attempted any other dovetails since. The Small Pine Chest was (and still is) my favourite project so far and I think I got very lucky with some quite tidy joints for a beginner.

I decided it was time to attempt to repeat the experience, almost knowing ahead of time that the first time was a fluke, and so to prepare for disappointment.

The idea for this project came from a small piece of Oak I had which was an offcut from the first ever thing I made. I decided it would make a nice lid for a box, and this with a length of 6" wide Pine board formed my stock.

I wont bore you too much with the starting process, needless to say that the bench hook, tenon saw and square, chisel and knife saw to cutting the pine to length, before using my no#4 plane and shooting board to shoot the ends clean.


Having all my components to size, I started to get a feel for the finished box.


After cutting to length I noticed a slight cupping of the boards and so dealt with this by planing across and diagonal to the grain with both my no#6 and no#4 .


Time to get my tools sorted for dovetails....

I used my new Veritas 1:6 dovetail template to make short work of marking out the tails, doing two boards at a time.  It's certainly more accurate and less fiddly than using a bevel gauge. Time for some chopping...


After a quick sharpening session, I decided to remove all the tail waste using only chisels. Previously I think I removed the bulk of the waste using a fret saw. Once complete I marked out the bespoke Pins one board at a time using the side of my no#4 plane to mate up the boards accurately.


Maybe as a result of watching to many Utube dovetail videos, I tried to make the effort to not be overly slow and meticulous about making this box. I certainly didn't fuss to much with cutting the tails knowing the pins are marked from the tails and should correct any innacuracies. Obviously you get faster and better with time, but I don't want to spend a week making a simple box.


Ok .. first dry fit... not as good as they should be cosmetically but it's certainly a strong box! Lesson learn't my board ends are slightly off square and hence my baselines are different either side of the board when marked out with the marking gauge. It's not a lot but enough to create gappy joinery. On with the show...

I thought it was about time I did my first ever grooved bottom and do the box bottom properly. 
Ta daaa....The debut of my new Record 44 Plough plane. After sharpening the 3/16ths blade and a quick practice with a small scrap of pine, I went for it. The groove was cut to (just over) 5mm deep, meaning I had to allow 1cm in length and width when cutting the bottom piece. I decided to put the grooves all the way through the pins and later hide the resultant holes with a skirt.


Time to cut some thin plywood for the bottom... 25cm x 17.5cm.


And do a dry fit....


The box holds together really tightly, it could probably serve it's purpose without glue.... I hate this bit!


Panic over - I managed to get it all together with a lot of banging with a leather faced mallet and a scrap of wood. Unfortunately, the sight of the joinery closing up nicely with the added gap filler of glue led to me applying slight too much pressure....Doh!


Not to worry - it's not the end of the world and I can probably doctor those small cracks when the glue is dry. The next step was to plane the old varnish from the box lid, trim it to size and add a decorative small bevel.


With the box out of the clamps I used my Stanley 102 block plane to trim the proud pins and tails before smoothing with my no#4.


The clamps and glue had helped to close up the dovetails, still not perfect and the odd one was a little gappy, but overall I'm not too disappointed as a second attempt. In the true spirit of 'full disclosure', the following pictures show the pins and tails of all four sides.

Basically at this stage the box is almost complete and I had a change of mind (partly due to laziness) about fitting a skirt to hide the bottom groove in the bottom half pins. Instead I thought I would keep it simple, try and match the grain as best as I can and plug the holes. 

I used a chisel to 'rive' off small pieces of  pine and trim to fit before glueing them in and finally using my flush cut saw to trim them off. I think they look fine.

So aside from having any hinges (which I'll fit at a later date) and a coat or two of Boiled Linseed Oil (BLO), I was done. All in all I am quite pleased with this project both in terms of how it turned out and the time it took me to do it. Being only  my second attempt at dovetails and my first ever grooved bottom made it interesting from start to finish without it becoming too epic.



Friday, 27 April 2012

LN-7 Jointer Plane

It's funny how things all turn out and help you make a decision. In the past week I have both sold my boat... and ... received a lovely letter (and cheque) from the Tax man.  Finally, the icing on the cake,... I was sent a discount email for 10% off any item from Axminster tools. 

Now, despite all the above, ... This decision did not come lightly I can assure you! I am sure the Quangsheng planes would have probably served my purpose adequately, in fact from the reviews I know they would. 
They sound like really good planes at amazingly cheap prices. But... I am thinking of this as a one time quality purchase and I would always be wondering or lusting after the Lie Nielsen tools. No political or moral views came into it - I simply could afford what I wanted in the first place, regardless of the quality and value for money of the competition.


It's lovely! ... If I get the same feeling from using this new no#7 plane as I get from my other LN tools, it's money well spent. I am also enquiring about a LN no#3 smoother in iron (not bronze), but I would like it with an O1 blade and the high angle 55 degree frog. I have decided against the LN no#5 Jack plane for the moment as my old Stanley no#6 has been (begrudgingly) earning it's keep with a newly cambered iron.

As the new no#7 jointer / try plane and my crusty rough and ready no#6 fore plane both have 2 3/8" irons I decided to also spring for the DMT Diasharp 8"x3" stones in both Fine and XX Fine (8000g).  I will still keep and use my 6"x2" DMT stones for chisels etc as they are a lot lighter and more portable for other work or jobs I may do away from the house.


And lastly, it's time I started doing a lot more dovetail work and treated myself to the Veritas 1:6 dovetail marker.


I will be using it in a little project soon....


Tuesday, 24 April 2012

How To Make Woodwork Tools - Charles H Hayward


Just thought I would share this little gem from circa 1945.


Tuesday, 17 April 2012

More Stools pt4

We're almost done ...
Ok so where are we ... Two stools, with all the joinery cut.

Both are structurally complete with all the components dry fit in place. The next step   is to round over all the sharp edges and put some shape into the seat ends and the centre brace ends.

I used my t(rusty) old Stanley 102 block plane to break the aris of all the edges and my no#4 to bevel the seat ends. I made sure to sharpen before starting as this is all end grain work.


Sand paper and a file was also used to smooth the edges where appropriate. The final shaping isn't complete as there will have to be further 'clean up' after gluing to finish it.

I also planed the components and done any final tweaking to make sure the joinery was tight.
Time for Glue Up...
I hate this stage! No matter how many times I do a dry run rehearsal and get everything ready, I always seem to get stressed and panic and it never goes smoothly. Regular readers may recall I had a nightmare when glueing the original stool. Glueing the smaller stool first, the same happened again!... The bloody glue makes the joinery (particularly the seat top to leg joint) really tight and everything starts to dry way to quickly! I had to really use a fair bit of clamping pressure to get all the joints up snug. It's a 'head job' because you spend all your time trying to make joinery nice and precise and tight, only to realise sloppier joinery would lead to a better final finish. The joinery didn't look as nice after glueing as it did during the dry fit...At one stage, I thought about aborting but it felt like I might struggle to get it apart in time. Leaving the stool to dry for 24 hours and having a limited number of clamps, I fearfully, began the glue up of the larger stool the next day - Friday 13th!
Luckily, the glue up of the larger stool went smoothly. Not having enough clamps, I only dry fit the center brace of each stool during glue up to keep the legs square. I will do these on both stools together after the main glue up is complete.

While the larger stool was in clamps I used my flush cut saw to trim the leg tops and side brace ends of the smaller stool and then again used the Stanley block plane and some sand paper to smooth the joinery.


Time to cut the legs so that the feet sit properly and the stool is level...
I used the kitchen work surface after checking it for flat to stand each stool on, before shimming each leg using folded paper to get the stool level. I used my combination square level to check both dimensions, before using a small block of wood and a ruler to mark around each leg.

I used my marking knife and chisel to further mark each cut and make the cut more accurate using my carcass saw. A quick chamfer of each leg using my block plane and sand paper to stop the end grain splitting if the stool is moved sideways on carpet for example and I am basically done.

I finally spent some further time cleaning up and sanding before rubbing each stool with a coat of Boiled Linseed Oil. I may experiment with some liquid wax finish as well.

So ... two stools finished. I think I prefer the look of the smaller stool. I definitely wont make any further projects two at a time. I seem to lose focus and miss being able to concentrate on the details of a single piece. Not to mention progress is obviously a lot faster... and more enjoyable.


Wednesday, 4 April 2012

Quangsheng Vs Lie Nielsen Bench Planes

A while ago I mentioned I was thinking about purchasing a Lie Nielsen no#5 Jack plane and also wanted a no#7. However, four months later I am still using my exceptionally crappy modern Stanley no#4 smoother and no#6 as a jointer / fore plane. With that in mind I have come to the conclusion that the preferred planes in my tool set would be a no#3 for smoothing, no#5 jack plane which could double as a large smoother if required and finally a no#7 for jointing and final flattening of stock.

I would probably only keep my crappy Stanleys for rough DIY type work or green wood etc.

In the perfect world I would love for all three planes to be made by Lie Nielsen, but at the following Axminster UK prices: no#3 £282, no#5 £282 and no#7 £369 - I simply cannot justify spending £933 - especially as a beginner! Can I?...

Having done a lot more research on plane manufacturers, I have discovered a UK company called Workshop Heaven who are selling planes made by Quangsheng at a fraction of the price of the Lie Nielsen ones. These planes are basically Lie Nielsen clones, based on the Stanley Bedrock design, complete with thick blades and 'improved' chip breakers 'a la' Lie Nielsen. The only constructional differences appear to be:
  • The  Quangsheng blades are T10 Carbon steel instead of A2 as used by Lie Nielsen. Some reviews have stated the Quangsheng blades are incredibly sharp and possibly sharper than A2 steel and hold a good edge.
  • The Lie Nielsen planes use bronze lever caps with the Quangsheng ones being brushed steel.
  • Lie Nielsen offer high angle frogs - whereas the only Quangsheng option would be putting a back bevel on the blade. I guess it's possible that the Lie Nielsen frogs might fit the Quangsheng planes?
Spot the difference...


According to the reviews I have found on the Internet and online wood working forum discussions, the Quangsheng planes are very good (albeit made in China) both in terms of construction, finish and performance, with some people stating there is very little difference between their Quangsheng planes and their Lie Nielsen planes. The biggest difference as far as I can tell is slightly tighter machine tolerances on the Lie Nielsen planes, translating in to slightly finer blade control.

The three planes listed above from Quangsheng would only cost £389 total, no#3 £90, no#5 £110 and the no#7 £190 - Wow!  That leaves a lot of change to buy some nice chisels....

I wrote to Workshop Heaven enquiring about the Quangsheng planes and they said:

'Officially the soles of all sizes are flat to 3 thou, although in practice they are typically better than half that.

We offer a lifetime guarantee on all of the tools we sell (your life not the tool's). I'm interested in regular happy customers, not a 100% record of never losing money on a deal.'


All in all they sound like a good buy...BUT ... would I regret buying them down the line?

So ... what to do?
Any readers own a Quangsheng plane or have any experience with them? Anyone know anything about them or can offer any advice - it would be greatly appreciated!

On a slightly different note - all progress on the Stools has been delayed due to me making the 'school boy error' of running out of glue - doh! I did intend to order some more glue online, but thought I might include a plane order...

Looking forward to your thoughts on the above...