Friday, 30 March 2012

More Stools pt3

Ok ... next comes the leg bracing for our stools. Each stool will have a lap jointed brace across each pair of opposing legs (I'll call it a 'side brace') and a longer single brace that runs down the center that is lap jointed into the side braces. Make sense?.... Hmn... maybe better explained in pictures.

First, the lap joint sockets need to be marked in the legs.


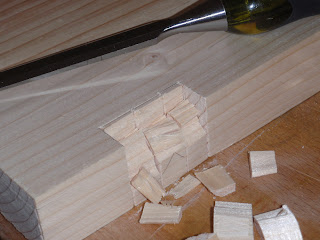
After marking out using the knife and being careful to get the complimentary 10 degree splay angle in the correct direction, I pared the cut lines with a chisel, before making three cuts per socket to help allow the waste to be easily removed with a chisel.


Two stools with four legs each, times three cuts per leg equals twenty four cuts to be made just for half a lap joint. What seems like an easy process seems to take me a lot longer than I think it will. It's easy to kill a few hours and not achieve an awful lot of progress...

Using the vice to hold the stock flush with my marking lines, I used the smaller chisel to remove most of one side of the socket to the center.

Then I flipped the work piece around to do the other side.


Then used the large chisel places directly in the baseline, using the vice jaws to keep the chisel face flat.


Finally finishing off by hand and paring away any roughness.

Now it was back to the bench hook to cut four lengths of wood, two braces per stool.


I placed the square braces directly into the sockets in the legs and marked out the joints to be cut with the seat top attached using a pencil. It was nice to see the pencil marks agreeing with both my square and bevel gauge almost exactly, meaning my joints must be acceptable and the stool is remaining pretty square.


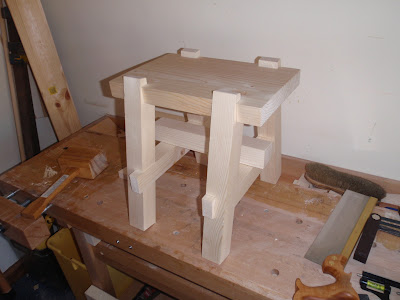
It's actually starting to look a bit like a stool... The center brace (just sitting in place in the picture above) is nice and straight forward with the joints cut at a sensible 90 degrees and therefore there is no messing around with bevel gauges. A couple of minutes center finding using dividers, some squared lines with the knife and a few strokes of the saw and a bit of chisel work later ...


We have a stool! On my previous stool I cut the center brace flush with the side braces, but this time I thought I would try and make a 'feature' of the end grain of the center brace which in turn will result in a stronger joint. In fact, even without any glue I was able to sit on the stool - albeit very carefully!

So ... Now repeat all the above for the other stool. *Sigh* I kind of wish I had done one stool at a time now as the progress would have been a lot faster. It's surprising how much time it takes to build such a simple little project.

Still to do:
  • Bevel and smooth all the edges and surfaces.
  • Dry fit and final trimming of joinery, before glue up.
  • Flush cut all the joints and trim the legs to match the splay angle so the 'feet' sit square.
  • Sand and finish.
Stay tuned...

Tuesday, 27 March 2012

More Stools pt2

The continuing saga...
This is the hardest part of this project, at least in my opinion - Cutting the legs accurately to produce a ten degree splay to the legs. The first thing was to group the eight legs into two lots of four for each stool matching the grain of each set and deciding which would be the visible outward face of each leg, hiding knots and other nasties on the inner faces.


Setting my bevel gauge to 100 degrees to give me my 10 degree splay angle (90 + 10 = 100), I began marking out the legs. unfortunately, I got so engrossed with concentration I didn't take any pictures to fully describe the process. 


In addition, I didn't think to limit my marking with the knife as I squared the lines around the legs, resulting in unnecessary marks on the show side of the legs - doh! I will plane and sand them away before assembly.


Luckily I noticed the error of my ways before starting the second set of legs and limited my marking to only those lines to be cut.

With the marking out complete and the waste clearly marked with Xs, I used a chisel to pare out the cross grain lines to make a groove for the saw. Placing the piece offset in the vice, I used the bevel gauge to make the cut vertical. My sawing accuracy is considerably better when cutting straight down vertically, probably due to gravity helping to hold the saw straight.
I started with the shoulder as it's a short cut and across the grain, so a nice and easy warm up for my sawing muscles.

Before cutting the rip cuts down what I guess would be called the 'cheek', I found it easier to use my dovetail saw placed in the knife lines to perform a 'stopped' cut across the corners of the cut on each side before placing the piece in the vice for cutting squarely down. 
Despite having done this identical marking out and cutting process a few times now, for both my original Rustic Stool and my Traditional Saw bench, it still takes me a surprisingly long time to carry out this simple task. Eventually, I had four legs all cut and pared, ready for use.

Now for the other four legs - Rinse and repeat as they say ...

The next step is to mark out the four cut-outs in each seat top to accept the legs. Simple marking out using a marking gauge (for the depth of cut) and a square. I set each leg 'socket' back from the seat end the same thickness as the leg.
I made four cuts to each 'socket' to make chiselling out easier with less risk of break out. Using a small chisel to begin with, I removed 80% of the wood from each side of the cut out.

Finally using my larger chisel placed directly in the knife line to finish the cut.


After a little paring with the chisel and size adjustment with a file, I had two standing stools.


Still a long way from being finished but at least they resemble something close to stools now.
The next job will be the bracing in pt3....


Friday, 23 March 2012

More Stools pt1

I am finally motivated enough to get myself back in front of the bench and actually build something - about freaking time! As you (regular readers) may well know, one of my 2012 resolutions was to 'sell some of the things I make'. Well this has been achieved by selling my Rustic Stool and has given me incentive to make a few more to sell. Mainly, to recoup some of the money I have tied up in timber.

The session began by discovering my bench top was no longer flat, maybe due to the arrival of Spring and the warm weather we have been having lately or my bench repairs I did a short while ago? Either way, before anything else could happen it was time to warm up with my trusty no#6 foreplane and a straight edge.

Once the top was vaguely flat, I also remembered I had yet to re-drill the dog holes to make the bench usable. A few minutes later I was ready to finally begin work ... no I wasn't. As I haven't been doing much wood work lately, I knew things would need a bit of a sharpen. My first tasks would be dimensioning the leg stock and processing the rough cut seat tops. 

Two large chisels, my marking knife and the no#6 plane blade, all sharp and ready to go...

I had previously rough cut four pieces of stock from one of my scaffold boards to make four stool seats, one small, two mid size and one slightly longer - all the same scaffold board width. I also had twelve meters of 2"x2" Pine leg stock.

Work began by planing the seat tops to remove all the rough saw marks to make marking out easier and basically get them flat. First across the boards, then diagonally and finally with the grain. This process allowed me to familiarise myself with the directions of grain flow and mark the boards where it changed direction etc.

The next step was to use a straight edge and get one of the long sides straight, followed by making the opposite side both straight and parallel. Luckily the boards weren't to bad and this went quite smoothly. 

To be honest, I know from previous experience that the stool's joinery is not too dependant on the seat tops being perfectly flat and square so I wasn't to obsessed with getting them perfect - it's a 'rustic stool' after all!

I did notice that the two medium size seat pieces were showing signs of cracking in the end grain, obviously from drying out to quickly. I decided to leave them alone to see how they develop over the next few days and only build two stools - a larger and a small one. 


The last step was cutting both ends of the board to get them square with nicely finished end grain using my trusty large tenon saw.


A short while later I had two seat tops ready for joinery. I hadn't smoothed them as this can be done later.


Time to dimension some leg stock...

I decided from my previous stool and the difficulty in finding a suitable size box to post it in, that both stools would have the same size legs, at least to begin with. I am not building from plans so this may change on down the line according to the look of each stool. The main thing is I know both will fit in my planned postage boxes.

Standard procedure, mark all four sides with the knife, pare out the cut line with a chisel and then cut squarely on the bench hook using my Carcass saw. I had to cut around the unusable knotty bits.

I love my Lie Nielsen saws, they are such a joy to use! I'm not sure if it's because I haven't done anything for a while but my sawing is more accurate then ever! It maybe (and probably is) due to my new adjustable square being more accurate than my larger more cumbersome cheap combination square?


Anyway, there we go ... Two seats and eight legs. The sun is out so that's enough for today, time to go and plant out some carrots in the sunshine.

Stay tuned for pt2.


Thursday, 15 March 2012

Richard Proenneke

Richard Proenneke Using only hand tools to build his life in the Alaskan Wilderness.


I just had to share this video, it's got everything from log cabin building, to furniture making and even some spoon carving - and all with only very basic hand tools. Amazing!...

Two other films about this remarkable man are also available to view.