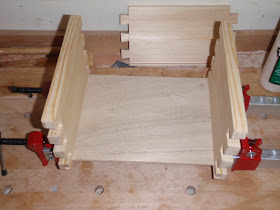
So, in the same style as my last dovetailed box I got started.
I wont go into great detail as the build process has obviously been covered before. Usual drill - cut the four pieces to make the box sides and shoot them to exact length. Exact length being - two pairs, each pair being exactly the same size - I didn't bother to measure actual length. I also made the effort to avoid all knots and only used clear straight grained pieces of Pine.
The next stage, mark out the dovetails, I'm still a tails first guy... and ... I got to try the new Poor Mans Moxon vice out properly.
My brain obviously hadn't woken up yet ... Look at my 'waste marks' ... phew! Luckily, I realised what I had done, before grabbing the saw!
I got the tails cut and chiselled out without any further mishap. Wow! ..What a difference it was using my lovely new LN chisels, I can get them ultra sharp compared to my old Stanley Fat Max beaters.
Before I knew it, I had a box. Im not sure if I am getting faster or just had more fun chopping out the pins, but it didn't seem to take long at all.
Time for some grooves, for the plywood bottom...
Then it was time for my least favourite part of the process - Glue Up!
With some clamping pressure all the dovetails closed up nicely and I managed to mop up most of the squeeze out before it caused me a lot of clean up work.
I let the box cure over night before using my block plane and number four Stanley to plane down the Pins and Tails.
Time for a lid ... Using one of the newly aquired Oak pieces I first cut off the end that was cracked and marked with nail holes and then cut again to my required length.
I used my no#6 Fore Plane to remove the old finish and get the board flat as it was quite cupped. Once squared and trimmed to size, I used my no#4 to add a nice chamfer / bevel around the front and sides of the board to form the lid.
Lastly, I whittled and spit down some off cuts of Pine to fill the groove that showed through the bottom dovetail. Once, glued and cut off with my flush cut saw, the box was basically finished.
I added some small brass hinges and finished the box with a coating of Boiled Linseed Oil and some wax paste.
Lessons learn't from this project...
- Marking the edges of the Pin boards isn't required, so don't do it any more.
- I think (untested) in future, I can make my groove easily stopped on one side (which would be the front of the box), then I only need to plug two holes at the back for a cleaner finish ... or just learn to do proper stopped grooves!


Thanks For These Great Plan To Build .To learn how you can download over 16,000 woodworking plans Click Here!!
ReplyDeleteHello, i have a new blog - FINE WOODWORKING IDEAS - http://fine-woodworking-ideas.blogspot.com/ - please join
ReplyDeleteWood working is an art, you are really good in it. Thank you for sharing this informative blog with us and keep posting
ReplyDeleteDownload over 16,000 WOODWORKING Plans at here http://woodworkingplanspro.weebly.com
ReplyDeleteWoodworking guide offers anyone of any skill level the ability to build amazing projects. The guide is extra helpful because it offers more detailed explanations, videos and blueprints then your typical woodworker magazine.
Arbor Projects ,
Adirondack Chairs ,
Artwork Display ,
Bathroom Unit ,
Box Designs ,
Billiard/Pool Table ,
Barn Plans ,
Bed Plans ,
Bedside Cabinets ,
Bee Hive Plans ,
Bench Projects ,
Bird Feeders ,
Birdhouse Plans ,
Boat Plans ,
Book Case Plans ,
Baby Changing Table ,
Coat Rack ,
Cabin Plans ,
Cabinet Plans ,
Carport Plans ,
Cart Plans ,
Cat House Plans ,
CD/DVD Holder ,
Cellar Projects ,
Chair Plans ,
Chest Designs ,
Chicken Houses
Childrens Room Plans ,
Clock Plans ,
Coasters ,
Coffee Table Designs ,
Cold Frame Plans ,
Compost Bin ,
Computer Desk ,
Containers ,
Cradle Projects ,
Small Crafts ,
Cutting Board ,
Deck Plans ..
Types Of Wood For Woodworking
ReplyDeleteConfused on what types of wood for woodworking Project? Learn about Hardwoods, Softwoods, Plywood, and MDC to see what best suits your needs.