Pages

Sunday, 19 August 2012

Shaker Stool

As I haven't built a stool for a while, I decided to try my hand at a Shaker style bench / stool. 
My scaffold boards have warped a fair bit in drying meaning a full bench was not really practical. Ok, I admit it, with a lot of planing it could be done, but my natural laziness told me to keep it small... hence I'm calling it a Shaker stool.

With some inspiration from Google images I rough cut my two side pieces of timber and attacked them with my winding sticks, a no#6 Foreplane set for a heavy cut followed by my no#7 Try plane set fine to get them flat.

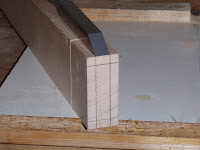
After getting the edges straight and parallel, I cut the ends square on the bench hook. 
I am definitely getting faster as milling rough sawn boards into usable stock.

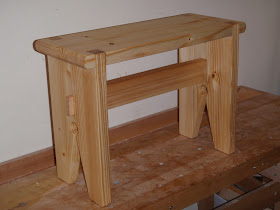
The main feature of this stool is the cut out design of the side pieces. I first found the centre of the board and marked the position of my desired hole. 

Now it's confession time... I didn't have an auger bit large enough and resorted to using .... A POWER TOOL!!!!! 

Yep, I drilled my hole with my cordless drill and I feel dirty for it!...In fact it made everything dirty - what a mess it made. To make matters worse there was also a lot of tear out between the hard and soft wood in the grain.


Finally cutting out the connecting wedge shaped bit of wood with my large tenon saw. Now I had my sides, I needed a seat piece, more milling... 
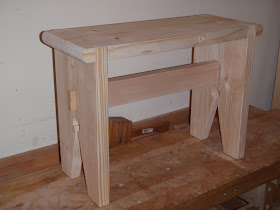
Soon it was beginning to look a bit like a stool...
Now I didn't have a plan and was just making it up as I went along, I had a loose idea of maybe some tenons in the side pieces coming up through the seat, but I didn't like the fact that the sides were the same width as the seat so there was no decorative overlap. 

I didn't want to reduce the width of the side pieces as that would make the stool less stable. Where the side pieces meet the top piece looks clunky. What to do.... I decided I would have the side pieces rabbeted into the seat for strength and see what it looks like  ... 
Hmn... Still rather clunky. My only other option is to have the 'tenons' come up through the seat on the outside, thus hiding the joint. I marked and chiseled out the recesses in the seat top and used it as a template to mark up the side piece tenons. 


I was finally happy with how the joint looked, now I just needed a 'cross brace' that would mortise and tenon through the side pieces. More milling...

With the brace all milled flat and true, I proceeded to cut the tenon on each end. Followed by the corresponding mortise in each side piece. 

I was aware (after I finished the tenons) that I should have cut the mortises first to ensure that the tenons would be a tight fit ... luckily they weren't too bad.
It all fits... Now it's my favourite part of the project... NOT!

Glue Up... Take the phone off the hook, lock the door. Get everything ready... do a dry run first.

I also added a chamfer to the ends of the seat top.

After gluing up the stool, it was just a matter of flush cutting off the protruding tenons, some final trimming and then applying a finish.


Friday, 3 August 2012

Happy Birthday To Me 2

In the 'tradition' of my last birthday, Axminster Tools and their free next day delivery got the better of me - again! I treated myself to a few 'shiny things' ... as I've said 'It's an addiction!'.


Firstly, a Lie Nielsen no#4 Iron bodied smoothing plane. I decided against the Bronze body as this more than meets my needs for a smoother. It has the standard A2 blade and I have the option of a high angle frog at a later date if needed. My 'beater' Stanley no#4 will be kept set rough, as that's all its capable of anyway to be honest. 

Secondly, an imperial Lie Nielsen Dowel Plate. I have some riven Oak and Walnut stock that will make nice draw bore pegs for Mortise & Tenon joints and dowels for boxes etc..

The other items include, a really posh Cap Iron screw driver which is lovely to hold and prevents scratching up your nice new premium planes as the brass collar captures the large screw head. A joiners Scratch Awl which unfortunately has a round shaft. I thought it had a square shaft when I ordered it... Oh well, it will still be useful.

And Lastly, I decided to get some Veritas honing compound to add to my home made leather strop block. A number of well known wood workers use it and some swear by it, so I thought I would see if it improves my sharpened edges.

Now I just need to put them all to work...

Thursday, 2 August 2012

More Dovetails ...

Yesterday was my birthday, and it seems that my girlfriend has secretly been practising her dovetails ... in cake!


Friday, 27 July 2012

Another Dovetailed Box

I decided to make use of my newly acquired antique oak mainly to see what it will look like when planed and finished. I also decided some more dovetails wouldn't do me any harm.

So, in the same style as my last dovetailed box I got started.

I wont go into great detail as the build process has obviously been covered before. Usual drill - cut the four pieces to make the box sides and shoot them to exact length. Exact length being - two pairs, each pair being exactly the same size - I didn't bother to measure actual length. I also made the effort to avoid all knots and only used clear straight grained pieces of Pine.

The next stage, mark out the dovetails, I'm still a tails first guy... and ... I got to try the new Poor Mans Moxon vice out properly.


My brain obviously hadn't woken up yet ... Look at my 'waste marks' ... phew! Luckily, I realised what I had done, before grabbing the saw!


I got the tails cut and chiselled out without any further mishap. Wow! ..What a difference it was using my lovely new LN chisels, I can get them ultra sharp compared to my old Stanley Fat Max beaters.


Before I knew it, I had a box. Im not sure if I am getting faster or just had more fun chopping out the pins, but it didn't seem to take long at all.


Time for some grooves, for the plywood bottom...


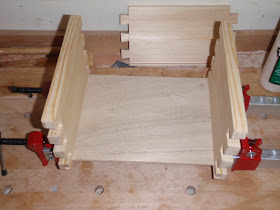
Then it was time for my least favourite part of the process - Glue Up!
With some clamping pressure all the dovetails closed up nicely and I managed to mop up most of the squeeze out before it caused me a lot of clean up work.


I let the box cure over night before using my block plane and number four Stanley to plane down the Pins and Tails.


Time for a lid ... Using one of the newly aquired Oak pieces I first cut off the end that was cracked and marked with nail holes and then cut again to my required length.


I used my no#6 Fore Plane to remove the old finish and get the board flat as it was quite cupped. Once squared and trimmed to size, I used my no#4 to add a nice chamfer / bevel around the front and sides of the board to form the lid.


Lastly, I whittled and spit down some off cuts of Pine to fill the groove that showed through the bottom dovetail. Once, glued and cut off with my flush cut saw, the box was basically finished.


I added some small brass hinges and finished the box with a coating of Boiled Linseed Oil and some wax paste.


Lessons learn't from this project...
  • Marking the edges of the Pin boards isn't required, so don't do it any more.
  • I think (untested) in future, I can make my groove easily stopped on one side (which would be the front of the box), then I only need to plug two holes at the back for a cleaner finish ... or just learn to do proper stopped grooves!


Monday, 23 July 2012

Antique Oak

Just a quick gloat post... 
A member of my girlfriends family discovered these pieces of very old Oak while clearing out his garden shed and kindly 'donated' them to me. Apparently, it was an antique chest of drawers that originated from the very house I now live in. 

While most of the pieces are a bit scarred, cracked and holed, with some careful trimming and planing and general TLC, I'm sure I can get some good use out of them. It's not every day I get work with woods other than Pine and this Oak already has built in 'character'.  

Thursday, 19 July 2012

Poor Mans Moxon Vice

Up until now I have been struggling with work holding on my little bench and its poor excuse for a face vice, especially if I need to hold a wide board for dovetailing for example.

My usual solution is to stand the end of the board on something below the vice and pinch one side of the board in the end of the vice and use an offcut to minimise the vice racking and hope it holds... Far from ideal!

Therefore, with my last dry (it hasn't stopped raining over here in the UK) scaffold board, I decided to make a poor mans version of the Moxon Vice (Utube).

Life started out by rough cutting the board to length. Raised beds function really well as saw horses. While sawing the board the cross cut saw started to bind indicating that there seemed to be a lot of internal stresses inside the wood. I had to finish the cut from the opposite side, at least its only a rough cut.
 

The next step was to rip the board into two pieces using my 5 ppi rip saw.
 
Again the saw started to bind and the wood actually split apart about ten inches before I completed the cut. Thankfully, the split was pretty accurate and not far from my marked line. After a quick assessment with the winding sticks it was time to get the boards flat and smooth.


For each board, I used my no#6 Foreplane to remove the rough saw mill marks and get a face basically flat and wind free before finishing it with my new Lie Nielsen no#7 Jointer plane. After the face I made one of the edges straight and square to the reference face.

Lastly, using a marking gauge, I marked all around the edge of the board before flattening the other face side to thickness and making it parallel with the first side. One thing I have learn't is always plane this second side across the grain towards the unfinished edge. If any spelching occurs, it will get cleaned up when completing the final edge. Finally, I made the last remaining edge square and parallel to the first edge.

With both boards basically four square, all that remained was to cut and square the ends on the bench hook.

After flattening, I ended up with one board being 1 1/4" thick and the other 1 3/8" thick. I glued a piece of 2"x2" timber as a cleat to the thinner of the two boards, this would be the back vice 'chop'. I thought that the added cleat would make up for the slight lack of thickness.

The last remaining step to get a functional vice was to bore the holes in each end to accept the F-clamps.

With the vice essentially finished, all that was required was to soften the corners with a block plane and give the whole thing a light coat of Linseed oil to provide a bit of protection. I used a pair of holdfasts to attach the vice to my bench.
 
The distance between the clamps (width of board the vice is capable of holding) is just under 24" and I didn't think to make sure it was over 24" when cutting the ends square as the thing looked more than adequate for my needs. With hindsight, 24" is a good minimum capacity, as a lot of furniture uses 24" wide boards.

One last note, the vice might be handy for work away from the bench as it fits really nicely on my Saw Bench. If the sun ever shows up, maybe some dovetailing in the garden?...